Halloween Craft Project: Paper Jack-O-Lanterns
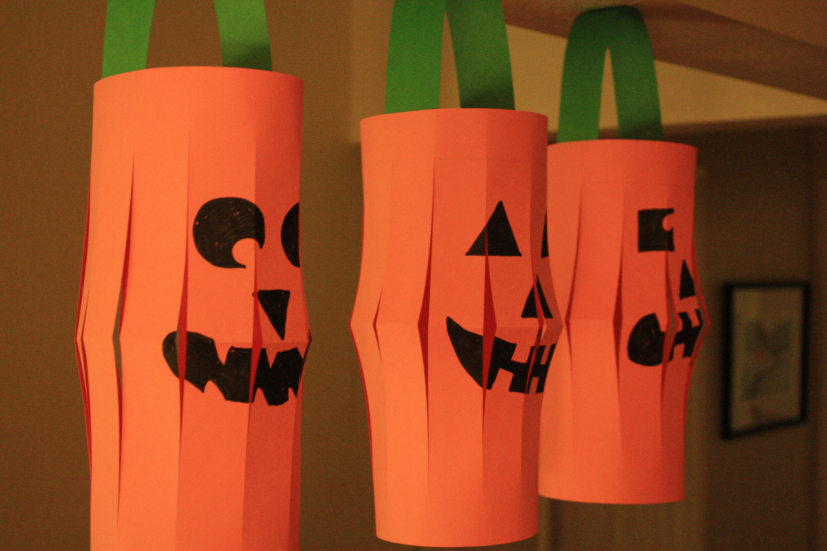
Kids always love to make fun decorative crafts, especially at Halloween, when they can help make the house or classroom extra spooky. These easy-to-make paper jack-o-lanterns are a Halloween-time take on the traditional paper lantern craft project, and are simple enough that almost anyone in the family can make them. Make a bunch with different face designs and hang them around the house.
Here's what you'll need:
- Orange and green construction paper (we used 12 x 18" sheets, but letter size will work, too)
- Black markers, paint, or construction paper
- Scissors
- A ruler
- A pencil
- Tape
- Glue
- A stapler
Here's how to make your jack-o-lanterns:
- Draw a jack-o-lantern face in the center of a sheet of construction paper. You can use back markers, paint, or cut out shapes from black construction paper and glue them on.
- Fold the sheet of paper in half lengthwise.
- With your pencil and ruler, draw a line lengthwise on the paper one inch from the top of the unfolded edge. This is your "do not cut line" that marks where you stop cutting.
- Now, take your pencil and ruler and draw lines one inch apart from the folded edge to the do not cut line.
- Cut the paper along the lines to the "do not cut" line.
- Now unfold the paper.
- Roll the paper into a cylinder and tape the narrow edges of the paper together where they meet. The middle of the lantern will flare out at the crease.
- Cut a strip from the narrow end of a sheet of green construction paper for your jack-o-lantern's handle/stem. Use the stapler or tape to affix the handle to the top of the lantern.