Children’s Casual Portraits: How to Get and Use the Best Lighting
 Marin Mommies presents a guest article from photographer Norm Levin, who gives us some terrific tips on how to get the most out of our casual family portraits. Norm is a Marin photographer who own Natural Portraits & Parties. For more information, visit naturalportraits.smugmug.com or call him at (415) 499-1403.
Click on any photo to enlarge it.
Children light up our lives. The question for photographers, i.e. Parents With Camera, is how to best light our children when we want to capture that special memorable moment.
First, understand that there are only two kinds of light: natural and artificial. Natural light is almost always from the sun (unless you have access to a starlight scope) and will be your light source for most of your photos. It can be a friend or foe, depending on how you choose to use it.
Note: I said “choose”, because as a photographer (PWC), your best results come when you take control of the situation. Here’s some simple guidelines for each type of lighting:
Natural Light
-
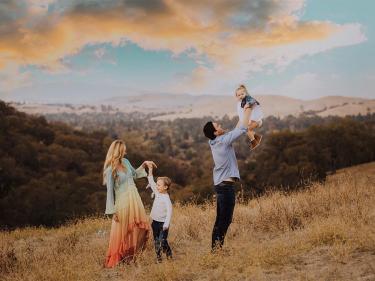
 Shoot early or late in the day. When outdoors in direct sun, the best most flattering light will come either in the morning or late afternoon when the sun’s rays are low. Then position your child(ren) between yourself and the sun or off to one angle. Avoid allowing the sun to shine directly onto their faces as this will 1) cause them to squint, 2) create harsh shadows under the eyes and nose, 3) run away. What’s more, daylight at these times is warmer, imparting that healthy glow we grownups often spend a great deal of money to acquire.
 - Use backlight. With the sun behind—or at least off to one side—your now more comfortable subject, you might be able to create glamorous halo effect from the light shining off their hair. Grandma will approve.
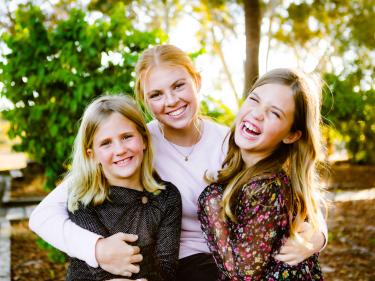
 Use shade. Indirect light is much more diffuse and gentler on the skin. Place your kid under a tree, in the shadow of a building, or under a canopy. Less heat, less friction, everyone wins.
- Shoot on a cloudy day. This is very simple. No bright sun, no harsh shadow.
- Shoot near a window. When indoors, have your child sit near an open window. This not only will give her something to look out at, but will let you use soft, indirect light, which is more flattering to young and old alike.
- Use a reflector. A simple white board from your favorite arts and crafts store will serve to bounce light onto your backlit subject.
Artificial Light
 Here’s where it can get tricky as there are as many different types of artificial (this term really makes no sense, as all light is real. Let’s call it manmade, or human made for the PC crowd.) A quick physics lesson: light comes in a wide range of wavelengths or “temperatures,” each with its own color. Think rainbow. Sunlight is a mix of them all, so it appears to us as white. Manmade light sources emit wavelengths weighted toward one or the other part of the rainbow, and are not white.
The human eye/brain combo automatically corrects for this, so to us everything looks pretty normal. To our camera, however, various light bulbs will emit different color temperatures that are neither natural nor flattering. Tungsten bulbs are generally yellow or yellow-orange; fluorescent bulbs wash us in green or pinkish tones; mercury vapor lamps (some streetlights) can be garishly blue-green. The little flash on your camera comes pretty close to matching sunlight.
 Adjust for the color. Many cameras, even a few of the garden variety point-and-shoot that most of us PWC own can be adjusted to compensate for these different light sources. Read your camera’s manual and look for the appropriate menu settings. More advanced single-lens reflex cameras certainly can be cranked to “white balance” for the right color. If your particular memory maker doesn’t allow for this, then use your flash for more accurate color. Under dim lighting conditions, it will probably go off anyway.
- Keep light source out of frame. This may seem like a no-brainer, as no one would point their camera towards the sun. Yet every night, someone somewhere is aiming at a lamp. Go figure. Bright bulbs of any type can seriously impair your photos by fooling the meter and making your subject too dark. The solution is as handy as moving your camera or the kid.
- Use your flash as a “fill-in”. Sometimes even when there’s enough natural light, you can get better portraits using a flash fill. Set your camera’s flash selector to show the little lightning bolt. What that should do is fire the flash under all conditions. This can be especially useful when you are shooting a backlight subject as it will make the faces stand out more, greatly reducing or eliminating their silhouette.
 Bounce or diffuse the strobe. Some strobe lights that are removable (don’t try this with your point-and-shoot) can be tilted upward toward the ceiling. That will greatly diffuse the light down and around your child. This effect can be enhanced if you can place a 4x5 card onto your strobe so that some of the light is directed forward and the rest up toward the ceiling, enveloping your subject in a blanket of all around light. It’s almost like having a mini-studio. If you’re stuck with a fixed position strobe, try taping a single piece of thin tissue or wax paper over it. That will also diffuse and soften the light, which will improve your portraits.
With digital cameras, you can take all the pictures you want, at no extra charge. Experiment with different light sources, and combinations of light sources. Kids move fast, though, so it helps to know in advance what works best in a given situation.


