Create a Cute Pumpkin Turkey Centerpiece for Thanksgiving

Every fall, my daughter is obsessed with pumpkins. She loves all the different shapes and sizes of pumpkins and winter squash, so we end up buying more than we can really use (there's only so much butternut squash soup and pumpkin pie you can eat).
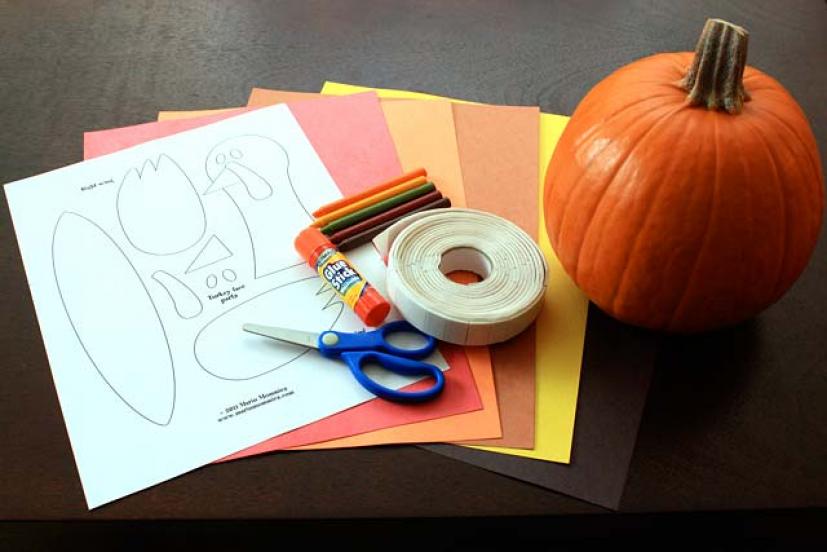
A couple years ago we worked together to create this cute pumpkin turkey centerpiece for Thanksgiving. We've made it a tradition to make one every year! We created it using a small “sugar pie” pumpkin (available at most grocery stores—we got ours at Trader Joe's) and craft supplies that we happened to have on hand.
This is a fun autumn project that’s easy to make for children of all ages (with a parent's help), and it looks fantastic on the dining table. My kids and I like to write what we're thankful for on the paper tail feathers, too.
To help you out, we made a template for the turkey head, wings and feathers, that you can download here; it's formatted for a standard 8.5 x 11-inch letter size sheet of paper.
What you’ll need
- Heavy construction paper in rich fall colors (we use brown, orange, yellow, red, and black)
- Crayons or markers
- Scissors
- A small “sugar pie” pumpkin
- A glue stick or craft glue
- Foam mounting tape or double stick tape (the foam mounting tape squares available at craft stores do a really nice job)
- Turkey centerpiece template (download here) printed out on plain paper
How to make it
- Download and print out the template on plain paper and cut out each of the shapes. You'll use these to create the parts of the turkey to attach to the pumpkin.
- Trace around the feather template to create nine tail feathers. We made three of each in brown, orange, and yellow. Kids can use their crayons or markers to draw a feather-like pattern on each one.
- Arrange the tail feathers in alternating colors and fan them out into a semi-circle. Use the double-stick mounting tape to hold the feathers together at the bottom. This tape will also hold the feathers to the pumpkin, so make sure you use enough. You’ll also want to tape each feather to the one next to it about midway along, which helps keep them in place.
- Peel the backing from the tape at the bottom of the feathers and adhere it to the back of the pumpkin, with the pumpkin sitting upright.
- Now trace and cut out the head and the face parts (the beak, wattle, and eyes). Use the glue stick to glue the face parts to the head, using the template as a guide.
- With the double-stick tape, adhere the head to the pumpkin, with the bottom of the neck about halfway down and the middle of the head resting on the pumpkin stem. Tape it down in both spots.
- Trace and cut out the wings—you can draw some feathers on them if you like—and tape them to the sides of the pumpkin.
That's all there is to it! Now step back and admire your creative handiwork and get ready for Thanksgiving.